Sunday, 8 May 2022

Slice like a Ninja…

 One of the main problems with older DSLR cameras is the highly compressed shooting format. 

For example my Canon 550d records H264 with a bit rate of around 45mbps which gives a good quality image but such high compression gives very little room for adjustment in post.

My Sony a5100 offers a slightly higher bit rate with its XAVC format offering 50mbps but shooting in that format for prolonged periods does tend to overheat the camera.

Modern cameras like the BMPCC record in Apple ProRes or DNG RAW for the best quality, but obviously they also cost a lot more.

This is where the Atomos Ninja comes in.  First released in 2012 the Ninja is a portable lcd monitor and hard drive recorder which records an HDMI input as ProRes up to 147mbps.

When first released the Ninja cost over £900 and was pitched at professionals looking to add tapeless recording to HDV cameras.

Ten years later the Atomos range has gone through a lot of changes and five versions of the Ninja adding a lot more functionality and recording options.  The original version of the Ninja can be found very cheaply on eBay.  


I picked this one up very cheaply and it came complete with original carry case and a selection of hard drives and ssd drives.


The recorder itself is very compact, measuring 4.5 x3.5 inches, and it is small enough to mount directly on top of the camera using a monitor swivel foot.


The system uses standard 2.5inch hard drives or SSD’s which are mounted in plastic caddies and slotted into the left side of the device.  Footage is downloaded using the usb hard drive dock provided.

Power for the recorder comes from standard Sony NP batteries, with two battery slots on the back of the recorder allowing for hot swap during recording which gives potentially unlimited recording times on location.


Control is via touch screen controls and the menus and buttons are very clear and easy to use.  The touch screen itself is not overly sensitive so it needs a good ‘press’ and hold on the screen in order to activate the buttons.  It’s not possible to accidentally brush against the screen and stop recording.


The screen is very bright, much brighter than the standard screen on a DSLR and it’s very easy to view even in bright daylight conditions.

If you use spinning hard drives rather than SSD then the recorder does give a very slight gyroscope effect that makes handheld operation a little strange.

The recorder requires a clean HDMI signal to work, so you will need to make sure your camera either includes clean HDMI out or can run Magic Lantern to obtain a clean signal.

The ProRes recording format gives larger file sizes than the H264 on my Canon with a 250gb hard drive storing about 3 hours of footage at the highest ProRes 422 quality.  However the jump in quality is really impressive when viewed against the in-camera recording.  

ProRes gives a lot more flexibility for post processing.  The footage can be pushed further in brightness without showing as much grain as the standard XAVC recordings on the Sony and for the Canon the footage is a huge improvement.  The original Canon H264 footage shows a lot of compression, especially in shadow areas but the ProRes 422 HQ files are almost noise free by comparison.

So if you are looking for a budget recording option that gives professional quality footage even from a budget camera, then the original Atomos Ninja is definitely worth trying out.


Tuesday, 28 December 2021

Is that a dolly in your pocket or are you just…


My latest kit purchase is a second-hand Kessler Pocket Dolly.  I already had a cheap unbranded slider but this one is a completely different level of quality.

First released in 2012, the Pocket Dolly was developed in conjunction with Phil Bloom, the DSLR blogger, and it really is a beautifully well made piece of kit.  The main components are lightweight aluminium and it features a rubber belt tensioner which allows for a very smooth movement with adjustable tension allowing for fast or slow movement when sliding by hand.  

There is also a manual crank on one end (although it seems to cause more shake that simply pushing the carriage by hand).

The real bonus with this slider is the fact that it can be motorised using the Kessler ElektraDRIVE motor system, which really brings an entirely different level of smoothness to the operation.

The system features a programmable controller which allows for up to three different moves to be recorded, plus a selection of different options for the amount of damping, speed of movement and the amount of damping on the control stick.  The main movement is controlled via the large joystick controller and this gives a really responsive control over the carriage.

There are several different motor options available from Kessler but mine came with the standard 100 series motor for general use and the higher-torque 500 motor for Timelapse and ultra slow movement.

The whole system is powered by a heavy duty (and weighty) battery which charges using a 12v car lighter adaptor (not something I’ve seen used in a power supply before) which will allow for charging on the move.

Overall I’m really pleased with this purchase and really looking forward to trying it out on a shoot soon.

Sunday, 14 November 2021

Testing my resolve

I’ve been editing with Adobe Premiere since the late nineties, and it’s always been my software of choice, especially as a windows PC user.  I just never got into the whole Mac ecosystem beyond phones and tablets so I missed out on final cut despite hearing great things about it.

Since the transition to Adobe Creative Cloud I’ve been finding it a lot harder to justify the monthly outlay on subscription fees given the amount of shooting I do at home.  

Recently I was involved in a narrative shoot for my day-job which included an extensive post process and edit at The Mill in London.  Watching their professional colourists working magic with Davinci Resolve really inspired me to take a closer look at that software.

Resolve has a free version which is almost fully featured but even the paid studio version is very reasonably priced at £225 and that means that for less than six months of Adobe CC you can own Resolve outright.

It wasn’t until I started looking at it seriously that I remembered I already had the software.  I received a license as part of the package when I bought my Blackmagic Pocket 4k but I’d never looked at it.  After a bit of a hunt around in my storage room I found the original box for the camera and sure enough there was the license card and the software on SD card.  

The version that came with the camera is Resolve 15 but Blackmagic offer free upgrades so the serial number works with the latest version 17 of Resolve.

So after a quick download and install, I’m now learning a new editing package for the first time in a long time.  It’s very straightforward to use, and Resolve even gives an option to set up the workspace to look similar to Premiere to help smooth the transition.

So far I’ve successfully edited a short mood-piece using some pro-res test footage from my BMPCC while trying out a newly purchased Lensbaby lens, and I found the editing process fairly straightforward.  There are definitely some quirks to Davinci Resolve but I’m pleased with the progress so far.

I found some great introduction videos by Casey Faris on YouTube which do a great job of quickly walking you through the basics, I’d highly recommend them if you are jumping into Resolve.  Search for DaVinci Resolve Crash Course, it’s about an hour and a half long and definitely worth checking out.


Monday, 8 November 2021

Not so deep fakes? Identifying SD cards with a hidden secret.


So I needed some SD cards to use with my original BMPCC, a camera which is incredibly picky about what brands and types of card it will accept.  This is literally the Goldilocks of cameras… not too fast… not too slow… just the right brand…

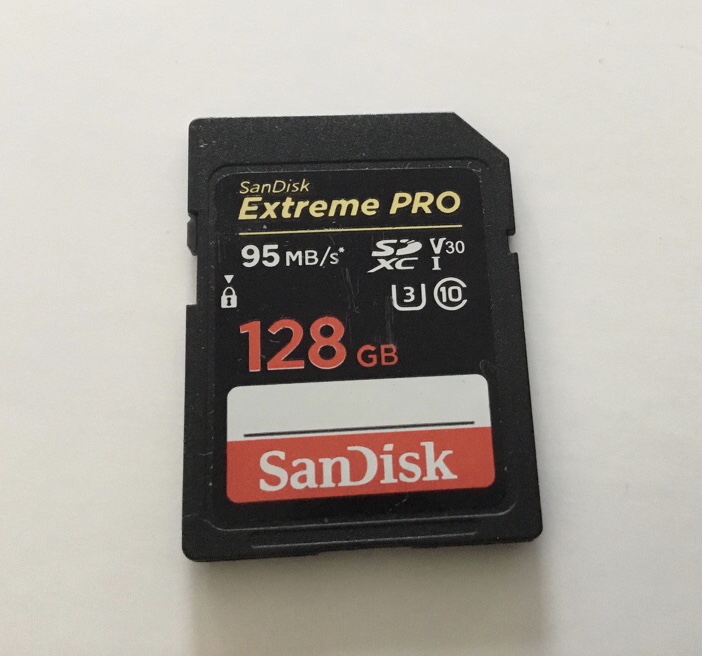
My search led inevitably to eBay, which is where the fun begins.  Obviously there are plenty of SD cards available on eBay, literally thousands of listings, all manner of brands, speeds and sizes.  The BMPCC needs an SD card from a very small selection https://www.blackmagicdesign.com/support/faq/43083.  In fact it’s almost exclusively Sandisk cards that will work with this camera, and in particular the Extreme Pro range of 95MB/s class 10 cards from approximately 2012-2014.

I wanted to get a few cards so I could capture some RAW footage, so I was looking for at least 128GB cards and there weren’t many of those available.  After a few days of auction watching I was able to score a few job lots of old cards and ended up with a good selection of cards including a load of 32gb & 64gb versions, plus some 128gb’s and even a 256gb.


I also picked up a few fakes along the way.  I thought it would be useful to look at a couple of them and see the differences.

Obviously the first difference is that a fake card is not going to work in the camera, so you will get the dreaded ‘no card’ message like this:


Firstly the thing to know about Sandisk cards is that they all look the same, they have the same plastic finish, same label style and all of them have a ‘made in China’ message on the back with a small serial number written in grey.

If your card doesn’t have those features then it’s a fake.  If it says made in Korea then it’s not a Sandisk card. If it has a different font on the front then it’s a fake, and if the label is not crisp and perfectly legible then it’s a fake.

Here are a couple of examples.

This first one is pretty good.  The label has the correct font and looks correct at first glance.  However on closer inspection the printing is fizzy round the edges, especially around the 128gb font.  The back has no serial number or Made In China message, and the sliding erase lock button is black instead of dark grey.


This next one is a more obvious fake.


The label has the wrong colour of foil printing and the wrong font, the black line is fuzzy and the sliding lock button is white instead of grey.  On the back it has a ‘Made In Korea’ message and a much larger and more complicated printing that a genuine Sandisk card would have.  I suspect this is a rebadged Lexar card.  Either way it doesn’t work in the BMPCC so it’s no use.

Here is a side by side comparison with a genuine card:


So that’s a couple of examples of fake SD cards.  Hopefully these images will help you if you are looking to buy some used Sandisk cards.  

I’m still searching for that elusive 512gb and hopeful I will find one at a decent price, but at least I’ve got some RAW ready cards to get me started.  The hunt continues.


Saturday, 9 October 2021

That old Blackmagic…


Another of my cameras that hasn’t seen much use lately.  The original Blackmagic Pocket Cinema Camera or BMPCC for short.  

I’ve had mine since it was first launched in 2013 and originally I was planning to use it to shoot a short film, but life and work got in the way so the camera hasn’t really seen much use.  Then in 2018 Blackmagic released the totally revised 4k version which I also bought, so my original BMPCC seemed destined to languish in a box.

But lately I came across a few YouTube videos showcasing the camera in action and I was inspired to dig mine out and take it for a spin once more.

It’s a quirky camera with a lot of minor niggles and issues, but it gives a lovely image and the small size makes it genuinely pocket sized (unlike the newer 4k model which is far too big to fit in anyone’s pocket).

I took my new lensbaby Sol22 out for a walk through the local streets and had a lot of fun trying out the tilt-focus features on that lens.  I will write up a more detailed post about that lens sometime soon.

In the meantime I realised one thing that really is a problem with this camera.  Finding a compatible memory card.

When I hit the camera there was a very small number of officially compatible SD cards and at the time I opted to buy one of the cheaper (but still expensive) Sandisk Extreme cards. This one offering a 60MB/s    speed which I hoped would be good enough to shoot RAW.  It wasn’t.

Turned out that only the higher priced Extreme Pro cards could handle RAW shooting.  I wasn’t worried though, because faster SD cards come out all the time, so no doubt once I was ready to shoot my film there would be a cheaper alternative to the SanDisk cards.

So fast forward almost 9 years and imagine my surprise when I checked the official SD card list on the Blackmagic website only to find it hadn’t really changed.  No new cards and no cheaper brands.  Almost exactly the same list from 2013.

Worse than that, a quick forum list check made it clear that modern V30 Sandisk cards don’t work with the camera, even if they are the same model Extreme Pro that once did!  So although a brand new Extreme Pro card is really cheap (under £20 on Amazon) they don’t work with the camera.

So the only way to shoot RAW with this camera will be to find a second hand SD card.  So that’s what I’m going to be doing next, trawling through eBay in the hopes of finding a decent sized Extreme Pro SD card released before the V30 upgrades, that won’t break the bank and hopefully still has some life left in it.

The hunt begins.


Saturday, 18 September 2021

Banks and banks of humming machinery… the Sony EV-C500e

 So having unearthed yet more boxes of old tapes in storage I realised that I had more 8mm tapes than I thought. Most of them date back to the late eighties and early nineties, before I switched to using MiniDV and there is a lot of footage to capture if I’m going to archive them all.

So I’ve set up a capture station using a second Sony VRD, this one is an MC6 which is a slightly more compact unit that is small enough to sit on a shelf under my studio desk.

Initially I was planning to use one of my smaller Hi8 camcorders as a playback deck but then I found this Sony EV-C500e Hi8 video recorder going cheap on eBay.

The EV-C500e was a revised version of the EV-C100 first released in 1993 and externally it is almost identical to the earlier units.

The EV-C500e is a compact bookshelf style with front control panel including jog shuttle and rear connections for video and s-video in/out plus a lanc control point for use with editing controllers.

The supplied remote is a small RMT-V124c model which is similar to several other Sony handsets and is likely to be interchangeable with other models.


The model I bought seems to be in good condition with very little head wear and is fully working.  I cleaned the heads before putting it into operation and so far I’ve had no trouble apart from one of my oldest tapes which had some pre-existing damage that caused it to jam while forwarding and unspool, I had to open up the recorder to remove the tape.

I’ve connected the C500 and MC6 using RCA cables as the MC6 doesn’t have an S-Video connection.  Most of these 8mm tapes are being transferred to DVDR for archiving, but I can connect the C500 to my Blackmagic Intensity for S-Video capture on PC if needed.


 Overall I’m very pleased with this new addition to my editing station.  I love the dark grey colour scheme and the EV-C500e is built with the usual Sony quality so hopefully it will have a few more years of service left in it.  Not bad for a machine that’s almost 30 years old.


Monday, 30 August 2021

Dusting off the blank DVDs

The age old problem of tape based media is that they are fragile.  Tapes are so susceptible to damp, humidity, electromagnetic interference and even simply being stored in the wrong orientation (my top tip is don't ever stack video tapes on their side... always upright.)

Anyway, capturing analog footage onto pc, collating and editing it and laying out to portable hard drive or DVD has always been a bit of a slog.  It’s a job that I tend to put off for a rainy day, but of course I rarely get around to it.  However I’ve realised that some of my old tapes are getting on for 30 years old, and it’s only a matter of time before they succumb to tape rot.  I needed to find a solution for quickly and easily archiving that old material.

And this is where the portable DVD recorder comes in.  I spotted this old Sony VRD model on eBay for less than £35 and snapped it up.  The VRD-MC series was first issued around 2006 and was designed to allow for quick and east transfer from camcorders and video recorders to DVD.  It’s basically a PC-DVDR drive in a case with a small LCD screen.

Mine is a second generation VRD-MC3


The MC-3 appears almost identical to the earlier MC-1 and it’s not immediately obvious what features changed between the models.  For the MC-3 the only real difference is the addition of a USB connector to allow direct docking with Sony branded HDD and DVD Handycams.

The MC-3 features a simple interface with settings for various footage sources, you simply select the appropriate source (e.g. ‘Analogue Video to DVD’) stick in a blank DVD and press play on the camcorder and hit the record button.  That’s it.  The lcd screen lets you keep an eye on the footage while it’s transferred and when the capture is finished you can either finalise the disc or add more footage by connecting another source and pressing the record button again.


The VRD-MC-3 has connections for analog/phono connectors and s-video as well as an iLink 1394 connection for DV cameras.  The system only supports Standard Definition video so it won’t be any use for transferring HDV.  There are slots for Sony Duo memory sticks, SD cards or Compact Flash.


I used Sony branded DVD+R discs to make sure I had the best compatibility with my living room DVD player as well as PC.  These discs seem to be getting a bit more expensive these days but hopefully they won’t disappear from the market for a few years yet.

So if you are looking for a quick and easy method to archive old analogue tapes, without the hassle of booting up the PC, or you want to transfer some iLink MiniDV footage then it would be worth picking up one of these recorders.

I’d recommend either the MC3 like mine or the slightly later MC5 as both of those models feature the S-Video connector.  The MC6 doesn’t support S-Video and is particularly low on features compared to the earlier models.  However the final model the MC10 does support S-Video so clearly there were a lot of complaints about the MC6.


The VRD-MC-5 (Pictured above) features an S-Video connector.


The VRD-MC-10 (Pictured above) was the final model in the series.  It added some extra functionality for the DVD menus and reinstated the S-Video connection which was missing for the MC6. The casing is slightly more compact and the plain black colouring is perhaps a little more hi-tech looking than the earlier white/black versions.